
Docker: portable environment
When setting up a development environment, eventually you’ll have to deal with migrating the services to another machine. Docker allows you to migrate docker images between servers, so you can take advantage of different VPS providers, more resources like memory, disk space, faster CPU or SSD drives.
Let’s firstly set up a VPS server with docker. I use DigitalOcean for a while now, since it’s fast, inexpensive and reliable. And they offer “one-click” installation of Docker, which is a nice bonus when you’re looking to quickly set up a server.
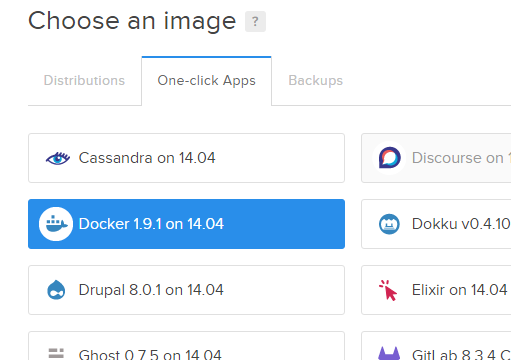
In the administration when creating a Droplet (this is their coined term for a VPS instance), choose Docker under the “One-click Apps” tab. I’ll be using an instance with 1 GB memory, just because I’m planning to run some slightly more memory intensive apps.
After setting up your VPS, you can succesfully connect to is as “root” via SSH. Docker is already installed, but there’s a few things I want to do with the machine first, before I start using it. As I’ll plan to use a few memory intensive services, I’m going to add some swap space. I’m going to add about 4GB, I’d suggest at least double the memory (2GB) if you’re keen on disk space.
root@luxor:~# dd if=/dev/zero of=/swapfile bs=4096 count=1048576
1048576+0 records in
1048576+0 records out
4294967296 bytes (4.3 GB) copied, 12.8606 s, 334 MB/s
So it took 12 seconds to reserve some swap space. Let’s quickly add it to the system so it can be used.
The first command, mkswap, creates a swap area in the file we created. The second command, swapon enables
the swap file and activates it for use. You can check if it works as intented by running free -h.
root@luxor:~# mkswap /swapfile ; swapon /swapfile
Setting up swapspace version 1, size = 4194300 KiB
no label, UUID=139e3307-f0ce-4594-979c-cd519e229211
root@luxor:~# free -h
             total       used       free     shared    buffers     cached
Mem:          994M       931M        62M       344K        35M       801M
-/+ buffers/cache:        93M       900M
Swap:         4.0G         0B       4.0G
The only thing left is to persist the swap file after reboot. This is a simple oneliner to do just that:
printf "\n/swapfile none swap sw 0 0\n" >> /etc/fstab
The command adds a line /swapfile none swap sw 0 0 to /etc/fstab. The swap file will now be activated
after a system reboot. Your docker images can use your system memory, and there’s swap available so you can
be less worried about running into issues.
Actually running something with Docker
Okay, okay. I know, there’s been a page of things about a server, and zero about docker. Let’s start with something not so basic. I want to set up a mysql instance, which will hold some data. I want to use the percona build of mysql, as it’s oriented towards InnoDB performance, and has better statistics than the traditional MySQL offering.
So, for those familiar with Docker, you know that a container for MySQL will have a mounted volume. This volume will hold your persistent data. When you want to do an actual migration, you have to take care of the container, as well as the data for the container. We will do this by hand, just to demonstrate.
I’ve created the following script, that runs the percona image. Keep in mind, that when you want to
migrate between machines, you’d have to match the version of mysql between them. You can do this by
replacing :latest in the following script, with the version you want listed on the docker hub for
the percona image.
#!/bin/bash
mkdir -p /src/db1/{data,conf,bin}
docker run \
    --name db1 \
    -p 3306:3306 \
    -v /src/db1/conf:/etc/mysql/conf.d \
    -v /src/db1/data:/var/lib/mysql \
    -e MYSQL_ROOT_PASSWORD="my-secret-pw" \
    -d percona:latest
I have chosen the /src/db1 folder to hold the files needed for the container. You can put custom configuration
into the conf folder, as per the documentation on the docker hub. The database data is stored under data.
I copied this script under /src/db1/bin/percona, just to copy it along with the data to other server(s).
root@luxor:~# docker exec -it db1 mysql -p"my-secret-pw" -e 'show databases;'
Warning: Using a password on the command line interface can be insecure.
+--------------------+
| Database           |
+--------------------+
| information_schema |
| mysql              |
| performance_schema |
+--------------------+
root@luxor:~# find /src -type d
/src
/src/db1
/src/db1/data
/src/db1/data/performance_schema
/src/db1/data/mysql
/src/db1/bin
/src/db1/conf
As you see, some data was created. Let’s test by creating some of our own data, just to demonstrate the migration. I’m going to create a table and add some rows. I copied the insert rows from this tutorial.
root@luxor:~# docker exec -it db1 mysql -p"my-secret-pw"
Warning: Using a password on the command line interface can be insecure.
Welcome to the MySQL monitor.  Commands end with ; or \g.
Your MySQL connection id is 7
Server version: 5.6.28-76.1 Percona Server (GPL), Release 76.1, Revision 5759e76

mysql> create database books;
Query OK, 1 row affected (0.00 sec)
mysql> use books;
Database changed
mysql> CREATE TABLE authors (id INT, name VARCHAR(20), email VARCHAR(20));
Query OK, 0 rows affected (0.02 sec)
mysql> INSERT INTO authors (id,name,email) VALUES(1,"Vivek","xuz@abc.com");
Query OK, 1 row affected (0.01 sec)
mysql> INSERT INTO authors (id,name,email) VALUES(2,"Priya","p@gmail.com");
Query OK, 1 row affected (0.00 sec)
mysql> INSERT INTO authors (id,name,email) VALUES(3,"Tom","tom@yahoo.com");
Query OK, 1 row affected (0.00 sec)

mysql> select * from authors;
+------+-------+---------------+
| id   | name  | email         |
+------+-------+---------------+
|    1 | Vivek | xuz@abc.com   |
|    2 | Priya | p@gmail.com   |
|    3 | Tom   | tom@yahoo.com |
+------+-------+---------------+
3 rows in set (0.00 sec)

mysql> quit
Bye
root@luxor:~# docker stop db1
db1
root@luxor:~#
After the data was inserted, I executed docker stop db1. This command turns off the container, saving all
data in the process. This is needed to enable migration from one host to another. I have another machine
at DigitalOcean, where I will copy the files.
root@luxor:~# rsync -a --del /src/db1/ airship:/src/db1/
root@luxor:~# ssh airship
root@airship:~# /src/db1/bin/percona
e8592d3b976dd330dd47e178c4bba2016e7ece36ae3edb7f708436d71098634c
root@airship:~# docker exec -it db1 mysql -p"my-secret-pw" -e "select * from books.authors;"
Warning: Using a password on the command line interface can be insecure.
+------+-------+---------------+
| id   | name  | email         |
+------+-------+---------------+
|    1 | Vivek | xuz@abc.com   |
|    2 | Priya | p@gmail.com   |
|    3 | Tom   | tom@yahoo.com |
+------+-------+---------------+
root@airship:~#
Cool. To sum up what we did:
- we created a mysql server, and populated it with data on one machine
- migration to another machine is simple a. stop the container, b. migrate the data to new machine, c. start a new container on the new machine
The good part about the procedure is that it comes down only to a few very standard commands. You have
full control about which version of mysql you run unlike packages that you can install and might change
the data to make it incompatible with other versions. With MySQL it’s usually safe to upgrade, but if you
would need to downgrade a version, you’d have to use mysqldump to migrate the data.
And lets say that by the time you’re migrating your docker container from one host to another the docker
hub might not have the docker image available, you may migrate it between hosts yourself. For example, I
have the titpetric/netdata image on airship but not on luxor, let me migrate it quickly:
root@airship:~# docker images
REPOSITORY          TAG                 IMAGE ID            CREATED             VIRTUAL SIZE
percona             latest              34494aeb3edc        44 hours ago        313.4 MB
titpetric/netdata   latest              108da9ccac72        4 days ago          372.1 MB
root@airship:~# docker save -o netdata.tar titpetric/netdata
root@airship:~# scp netdata.tar luxor:/root
netdata.tar                100%  368MB 122.7MB/s   00:03
root@airship:~# ssh luxor "docker images"
REPOSITORY          TAG                 IMAGE ID            CREATED             VIRTUAL SIZE
percona             latest              34494aeb3edc        44 hours ago        313.4 MB
root@airship:~# ssh luxor "docker load -i netdata.tar"
root@airship:~# ssh luxor "docker images"
REPOSITORY          TAG                 IMAGE ID            CREATED             VIRTUAL SIZE
percona             latest              34494aeb3edc        44 hours ago        313.4 MB
titpetric/netdata   latest              108da9ccac72        4 days ago          372.1 MB
root@airship:~#
So, today we learned:
- how to migrate docker images (
docker saveanddocker load), - how to organize your docker container configs and data so it can be migrated easily,
- how to perform a simple migration of a docker container and data
If you like this tutorial, consider buying my book, API Foundations in Go. If you’d like to register on any of the DigitalOcean links, they contain an affiliate code which gives you $10 and makes my bill a bit lower after some time.
While I have you here...
It would be great if you buy one of my books:
- Go with Databases
- Advent of Go Microservices
- API Foundations in Go
- 12 Factor Apps with Docker and Go
For business inqueries, send me an email. I'm available for consultany/freelance work. See my page for more detail..
Want to stay up to date with new posts?
Stay up to date with new posts about Docker, Go, JavaScript and my thoughts on Technology. I post about twice per month, and notify you when I post. You can also follow me on my Twitter if you prefer.