
Building your own build status indicator with GoLang and RPi3
A few months ago I had been participating in the Docker Maze challenge, where I was awarded a Raspberry PI 3. The package was lying on my desk for more time than I care to admit, but finally I decided on a project which seemed interesting to me. I was going to make a build status indicator. Whenever one of my projects would fail, I would turn on some external peripheral that would let me know that something broke.
Connecting the relays
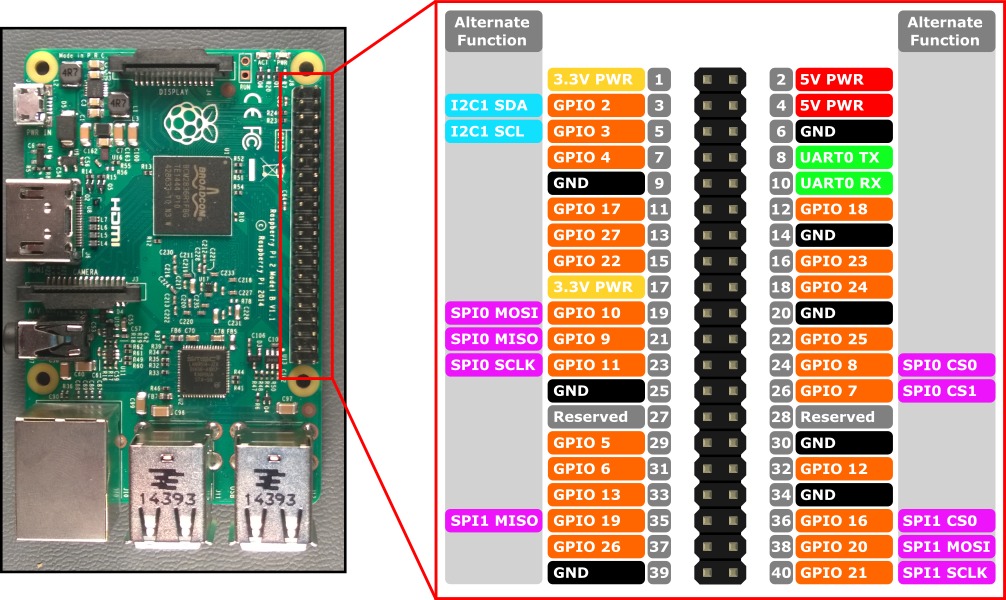
So over a few weeks I’ve ordered a 4-channel relay, an 8-channel relay, bought a bread board and bunches of pin cables. The Raspberry Pi 3 Model B has a 40 pin GPIO header. Substracting GND (8x), PWR(4x) and UART(2x) and reserved (2x) ports, there are 24 directly usable pins. Some have I2C and SPI modes available, but they are directly usable as a normal GPIO. So, in theory, you could run 24 relays with one RPi3.
I installed the latest Raspbian onto the miniSD card and wired up the whole thing via the bread board. I’m pretty sure that there’s some good practice I should follow in regards to how I should wire the thing - but to be honest, I didn’t have a single electronics class in about two decades. This is my “final” state:
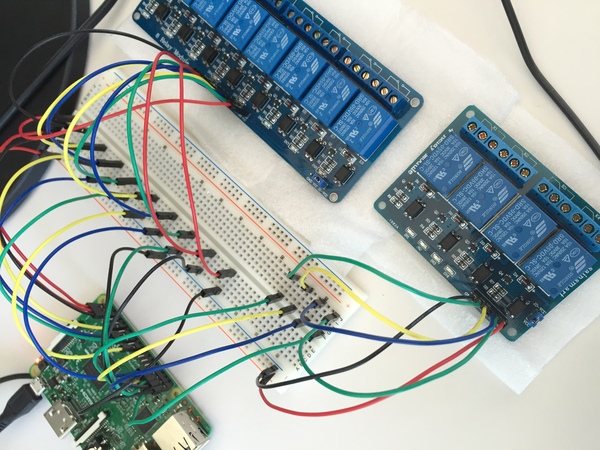
Both relays connect with the 5V VCC, GND, on each side of the pin header. Individual relays are controlled by GPIO pins (1-1). I connected the 4-channel relay to GPIO pins 26, 19, 13 and 6. The 8-channel one is connected to 24, 23, 18, 25, 12, 16, 21 and GPIO pin 20 respectively.
How to use the GPIO ports
The steps to use a GPIO pin are very simple:
- Export pin for usage/addressing,
- Set the direction of the pin (in = reading, out = writing),
- Set the value of the pin (0 = low, 1 = high)
To activate a relay you need to set individual pins to “output” direction and “low” value.
GPIO Pin interface
I created a GPIO_Pin interface which handles setting the direction of the pins, and the value to trigger individual relays.
type GPIO_Pin struct {
  Name string
}

func (r GPIO_Pin) Filename() string {
  return "/sys/class/gpio/gpio" + r.Name
}
func (r GPIO_Pin) write(where, what string) GPIO_Pin {
  filename := r.Filename() + "/" + where
  ioutil.WriteFile(filename, []byte(what), 0666)
  return r
}
func (r GPIO_Pin) Output() GPIO_Pin {
  return r.write("direction", "out")
}
func (r GPIO_Pin) High() GPIO_Pin {
  return r.write("value", "1")
}
func (r GPIO_Pin) Low() GPIO_Pin {
  return r.write("value", "0")
}
I return GPIO_Pin structs so the the calls can be chained like this: pin.Output().Low(). It makes
the code a bit more concise as well.
Exporting the pins
As you’ll notice, the GPIO_Pin only handles setting the direction and the value of individual pins,
but doesn’t export them. I created a GPIO struct which provides a Pin constructor, which also
takes care of exporting the requested pin.
type GPIO struct{}

func (r GPIO) Pin(name string) GPIO_Pin {
  pin := GPIO_Pin{name}
  filename := pin.Filename()
  if _, err := os.Stat(filename); os.IsNotExist(err) {
    // export gpio pin
    ioutil.WriteFile("/sys/class/gpio/export", []byte(pin.Name), 0666)
  }
  return pin
}
Until the pin is exported, the location /sys/class/gpio/gpio[pin] doesn’t exist. The Pin function
checks for the existence of this location, and if it doesn’t exists, triggers the export.
I’m pretty sure you need the latest Raspbian for this to work. This bash snippet should illustrate
what I’m doing here with Go code.
#   Exports pin to userspace
echo "18" > /sys/class/gpio/export

# Sets pin 18 as an output
echo "out" > /sys/class/gpio/gpio18/direction

# Sets pin 18 to low
echo "0" > /sys/class/gpio/gpio18/value

# Sets pin 18 to high
echo "1" > /sys/class/gpio/gpio18/value
Source: Bash Script Control of GPIO Ports
Putting everything together
I decided to start small by animating the LED indicator lights on the relay boards. I created a loop that would cycle through all of the leds on the 4ch and the 8ch relays.
func main() {
  pins1 := []string{"26", "19", "13", "6"}
  pins2 := []string{"24", "23", "18", "25", "12", "16", "21", "20"}

  i := 0
  gpio := GPIO{}
  for i < 40 {
    i1 := (i) % len(pins1)
    gpio.Pin(pins1[i1]).Output().Low()

    i2 := (i) % len(pins2)
    gpio.Pin(pins2[i2]).Output().Low()

    i3 := (i + 4) % len(pins2)
    gpio.Pin(pins2[i3]).Output().Low()

    time.Sleep(200 * time.Millisecond)

    gpio.Pin(pins1[i1]).High()
    gpio.Pin(pins2[i2]).High()
    gpio.Pin(pins2[i3]).High()
    i++
  }
}
Three relays are active with LED indicator on each loop iteration. The 4channel relay only lights up one led and moves to the next one in the next iteration, while the 8channel relay lights up the Nth, and the Nth+4. Whatever, I better show you a video here.
Running Go from Docker
You can run this whole thing in Docker if you’d like. You can mount the /sys volume without adding any additional privileges to the container. It’s generally
a good idea to avoid --privileged in favor of --cap-add if you need something specific. This works on the RPi without problems:
#!/bin/bash
WORKDIR="/go/src/app"
docker run -it --rm=true -v /sys:/sys \
           -v $(pwd):$WORKDIR -w $WORKDIR \
           apicht/rpi-golang go run main.go
Wrapping up
Using GPIO pins on the Raspberry PI is qute easy, and writing this interaction in Go is done without complications. I still have a lot of work to do however to expose these GPIO ports to information from our Buildkite CI. It seems I will have to write an API or two to achieve this - it’s a good thing that I wrote API Foundations in Go.
While I have you here...
It would be great if you buy one of my books:
- Go with Databases
- Advent of Go Microservices
- API Foundations in Go
- 12 Factor Apps with Docker and Go
For business inqueries, send me an email. I'm available for consultany/freelance work. See my page for more detail..
Want to stay up to date with new posts?
Stay up to date with new posts about Docker, Go, JavaScript and my thoughts on Technology. I post about twice per month, and notify you when I post. You can also follow me on my Twitter if you prefer.